Friday, March 15, 2013

Pinyapel

I have unfortunately had very little time to work on getting a new system set up between work, and travel, and life. BUT I do have one thing to share.  This is a minor, but very exciting update.

My. Pineapple. Is. Fruiting. And it is winter in the Northeast.


Sorry for the orange tinge to the picture, I have an HPS lamp on it to compensate for the short days of weak light, I am hoping that come spring/ summer it will be in full fruit (right now it is about the size of a fist, or a little smaller) and I can move it outside to get the full glory of the sunshine.

It is also developing a couple of slips, which grow on the main stalk and can be rooted much like a cutting taken from the top, except from what I have read grow to fruit about 6 months sooner than a top will. So I may be keeping a couple of plants around!

That is all for now,
Namaste

Tuesday, January 8, 2013

Some Summer Updates


Hello again! It has been a busy few months since last summer, in non-horticultural areas of my life (looking for and starting a new job being a big part), but I have been sitting on a bunch of pictures from a project I had worked on for a while and finally put into action last summer without a great deal of success.  None the less, I will share with you one big design failure. Though I will say while this particular iteration was unsuccessful, I am hopeful many pieces of this can be reused.

My goal was to build a free standing, plastic free, vertical, drip driven berry patch (mostly using strawberries, but with intent to add raspberries, and maybe blueberries once I stabilized it...)  And while in the short term the design worked, later due to what I have assumed to be a poor material choice, and inadequate monitoring of my nutrients, the plants succumbed to incapacity to thrive, and eventually most died off before I decommissioned the whole structure.  None the less there were a few cool parts to talk about, and up until everything started going brown I took a number of pictures, so let's look at the highlights!

As it always does, it started with an idea, this particular idea being for a check valve lift mechanism, rather than the ball inflation needle design I had used in the past.  The theory being without the possibility of backflow due to increased pressure with increased height, this could lift higher easier. If the only way out is up, then up the water and air must go, right?

My ideas often become drawings:


Then I find materials, and my ideas get simpler:

Then I run into issues, like it not working. And I tweak to get it to where I want.  This alteration being that I cut the piping between the check valve and the T joint, and added a 4"piece of 1/4" copper tubing, as small reservoir. It worked:


So I had this new pump mechanism, this was back when I had the Pentatower going, but I didn't trust it there because it was untested, and I was a little skeptical.  So I had this dirty old galvanized trashbin at my apartment, and sitting on the deck one day I thought it might be a good reservoir. So I got a clean one, and caulked all of the seems with silicone. 
This more than anything else was the poor material choice,  by the end it had rusted (but the seams were good!), and while it wasn't structurally at risk I suspect that there may have been toxic levels of iron in the solution.
 
Punched a whole in the center of the bottom.

Did this:

And there it sat for a bit, until one day I was cleaning up some things, and found this old tripod, formerly the base of a drum kit cymbal stand, which had lost its matching pieces.  Oh and I made a giant net pot out of 1/4" steel mesh.

And so it sat for about a year, I put some water in it to check for leaks, there were none.
Put some air stones in it to prevent stagnation. Put a lid on it, and left it in the summer of 2011. I just didn't know what to do next with it I was planning to suspend the pentatower from the top, but just couldn't think of how to do it. So it sat, until I remembered I had another piece of pipe like I used in my portable tower, which I thought would sit nicely on top of the tripod. It did, I stabilized with some insulating foam strips coiled around the base, and made a cut out of the lid to use as an umbrella of sorts to keep water of the iron wire I used to anchor the base:

Giant net pot, connected the lift tube:

It worked! This thing was easily 7-8' of lift, and it had no trouble, even with low pressure due to long air lines:

So me and my friend stared at it for a bit and eventually had a couple ideas that seemed interesting, so I went with it.  Whole thing, made a cone thing out of mesh:

Filled 'er up (over 5 gallons of hydroton) and cut little inverted Ts in the mesh to make planters:

And put in the berries!

And so it was for weeks, the plants did great at first, then they started looking a little iffy, the airline got detached for a day at one point, and then it was all down hill.  Plants dropped like flies, turning vibrantly red first.  And around this time I realized how impossible the idea of a water change was...  I will also mention that while I stopped taking pictures at this point, I also put berries in the giant net pot, with a fogger in the reservoir, though it wasn't air tight, so everything outside of the drip ring from the 'umbrella' dried out on a hot day.  And in the end when I disassembled everything there was A LOT of corrosion everywhere, so changing water was at least necessary.  Also not having a good way to monitor nutrient levels was a problem with rain, and hot days skewing my conception of water::nutrient usage.
While I did not produce anything, I still think the pump mechanism was great and will use it again.  The cone tower thing, well that I am up in the air about, I may give it another go.  The tripod, detachable, scalable lift tube is definitely a keeper, I could potentially put the pump mechanism directly at the bottom, drop it at the shores of a lake and call it a day.  And who knows, maybe with the right coating (wax maybe?) the galvanized been could work too.  Just a perfect storm of issues this time around.


In other news!

10 foot tall tomato plants!  And some awesome daily harvests from the soil:


Our compost sprouted tomatoes, and then our whole garden did! And those raspberries really took off!


And my pineapple is unwieldy. No fruit yet, hopefully in the next 6 mos.


Thank you for reading,
Namaste.

Thursday, May 10, 2012

Basic Permacultural Forays

Finally did something interesting that warranted a post again! This time on the soil front.  Over the past few months I have been doing some mild research into permaculture, complimentary plantings, traditional practices and the like, and this season had the chance to try some things out in our garden.  The first thing is a new style of corn cultivation.  In past years, we did the basic rows, and while we certainly have had some very fruitful years, I always have believed that grain cultivation in general (corn less so, but still) is very inefficient in its use of space.  So this year we decided to go the traditional route, and try growing our corn in hills.  And then we took it a step further, putting our squash plants in the middle of the hill, so they will fill out the ground beneath corn, utilizing multiple vertical layers of growing space in the given ground space.  And still plan to take it another step further, by adding pole beans into the mix once the corn has reach 6" or so, effectively using the corn stalks as poles for the bean vines to grow up (hopefully) utilizing yet another layer of grow space in the given ground space.  So in the long run, we hope to get three crops from one 6' x 10' plot of our garden.  I made six hills, all planted with eight corn stalks around the outer ring of the hill, and three squash plants in the middle (two hills are spaghetti squash, the other four ar butternut), we will probably pull/ transplant a couple of those plants once we know how many sprout, but that is the initial.  And I have yet to definitively decide, but at the moment am planning on 1:1 bean:corn.  
On a minor side note, this was also inspired by our lack of space left for corn, after half of our potato patch from last year (even at half a large piece of our garden) re-sprouted from potatoes (accidentally) left in the ground last year.
You can see the potatoes just to each side of he hills.  Will post more pictures as these fill out.

Also inspired by my boredom with row planting, and by my brother's quickly approaching wedding, I planted our lettuce with a little more creativity this year.  Hoping it will fill out just in time for when we have guests in a week from now.


Also, we have added yet a few more plants to our permaculture (perma being short for permanant) repertoire.
Raspberry canes just beginning to sprout.  These will become an approximately 2' wide thicket over the next couple of years.
 And asparagus, which could technically have been harvested this year, but is better to be left to establish for a year, hence the lankyness.
 And this is what asparagus becomes if not harvested!
 And this isn't new, but the strawberries really took over this year, most of them are already flowering and fruiting from our unseasonably warm spring.  Plan to grab a few to reattempt growing them hydroponically, see if I can't conquer my mite problem. And those blueberries are starting to really fill out! Just hope the birds don't eat them all this year!

Now the benefits of permaculture are diverse, and there is a whole (growing) school of thought surrounding these benefits, and the ways to implement come in a wide range of methods.  Everything from hydroponic systems that utilize aquaponics, and complimentary plants on a small scale, to edible forest gardens where people spend years establishing a plot of land as a hearty ecosystem that is also very fruitful relative to a natural untamed plot.  There are tons of principles that go into these different methods, and depending on the goals, the means change just as much if not more.  But things like thinking of how to best utilize a plot of land (i.e. looking at vertical layers, complimentary plantings).  How to best reduce input into the ecosystem (i.e. using aquaponics or vermiculture [worms] as a nutrient source, complimentary plantings as pest deterrents).  Reducing carbon loss in the soil (i.e. not tilling or burning, increasing composting). Increasing soil retention of water and nutrients (also not tilling, but also introducing fungal growth in the root zone).  And utilizing multiple points from the ecosystem (plants but also animals and fungi).
One thing I have been getting really interested in as of late is mycorrhizal fungi.  I was given a sample of Extreme Gardening's Mykos recently, which is essentially the spores of one type of these fungi, and it spurred my research mode.  So I looked into what the benefits of this type of inoculation is, and even the off hand benefits are fantastic.  Basically, these fungi come in a variety of types, and you could probably spend your life researching them, but they generally create a complimentary relationship with the root systems of different plants.  They grow around, or connected to the root hairs.  And because of the biology of fungi, they are able to effectively increase the surface area of water and nutrient uptake to the root system, simply because fungal mycelium (kind of like fungal 'roots') are smaller than even the smallest root hairs.  They also have the benefit of increasing water retention, can process otherwise inaccessible minerals into forms the plants can use, and in some cases can act as a buffer/ bank for some nutrients that would otherwise wash away in the rain (phosphorous comes to mind).  All around leading to fuller, healthier soil systems and plants!  And occasionally you can find an edible fruiting type, so all the more potential for food production.  These can also be used in hydroponics, though I am just trying it out now, so I'll have to let you know how it turns out.


And on the hydroponics front! Nothing particularly new compared to last year (aside from the mykos inoculation). Though I have added a new supplement to my nutrient solution that is focused on root growth and health.  Interestingly it contains brewer's yeast, which I would have previously assumed would damage the roots (in fact once one of my systems started to smell faintly like a brewery and I hastily changed the water because of it), but apparently not, so I will have to do a little research on that. But my plants seem to be loving it, they are only a week or two established in these pictures and they are loving it.
This year I am trying all cherry tomatoes in this system, straight DWC this time. Varieties are yellow pear, polar baby, and a traditional red cherry. So we will see which does best.

Went for a jalapeƱo pepper rather than bell this year, hoping that a smaller pepper will be more fruitful in the system.  Circled in sweet basil.  And cilantro is expected for the last spot, if/ when they sprout.

And my pineapple plant! (Or ananas plant as most other languages would call it...)
It is probably 10 months since I put the cutting in my system last year, and has been loving life since the sun came out a few weeks back.  And I changed the water/ cleaned the bucket for the first time in over a year, and since it looks healthy as ever, new growth is hearty and a nice deep green.  Still a ways to go before it would fruit, but at this rate, I am hoping!


And on a side note, the other day when I was looking through our seedlings I found this little guy hanging out in one of our seed starter trays, inside of our sun porch.  Lucky for him though, he avoided a chilly night, and I noticed him and set him free before he became dog food.


Be well wonderful readers, Namaste.

Sunday, January 22, 2012

Infestation, updates, and Rudimentary Fungiculture

For the past couple of weeks now I have had yet another infestation of spider-mites.  This time they took over my strawberry plants which had been doing very well otherwise.  Because my strawberries are perennial and I intend to have them for a while I looked into ways which I could fix the problem.  Apparently these little buggers like it to be dry, which it has gotten very much so as of late.  One solution I found was to spray a mixture of alcohol and water onto the leaves to kill the mites, then spray with water  frequently in order to prevent new spreading of the mites.  Unfortunately this didn't seem to work, so I got a product called liquid ladybugs which is also sprayed on.  As well I cut back the majority of the leaves with substantial necrotic portions to open up the space and try to remove the most affected parts.  And since I seem to have controlled the problem, so fingers crossed.  Though I did notice that some other plants in the room (just foliage house plants) the mites had spread, so I removed that as well to hopefully prevent further outbreaks.  One strange thing is that for the last month I had been growing basil in the other bucket on the table, and that never had a problem (I unfortunately didn't take any pictures before chopping it, but I did get quite a lot for only a month in the winter).


Here is a pic of it post cut back, with a couple underdeveloped strawberries. 
And a little rosemary plant to the right.


Also, I found just the right board in my shop for a table extension I have been meaning to do.  Really simple, plywood of the right dimensions, two legs that rest on another table to the left, and screwed to the top of the main table, with a hole cut for the pineapple DWC bucket.  Here are some pictures of the add-on profile, and the whole DWC table under HPS.  During the day (if it is sunny) this is the most sun-kissed area of the house, the south west corner.  With the low slung sun, these plants get decent light until about 4ish.
Simple but effective tables for my indoor sunken DWC systems.
Pineapple is doing awesome! Hopefully even better now that it is closer to the light!

Along the back you can see my alga-culture jars.  
And that big jar is a green house to increase humidity for the sage it covers.


And another little foray I am getting into is fungiculture! This time around we went simple and ordered a premade organic mushroom patch from Fungi Perfecti.  We are trying out the Shiitake (right) and Lion's Mane (left) varieties.  The Shiitake is 'open' to the air under a humidity tent mushroom caps forming across the surface, while the lion's mane remains inside of a plastic bag emerging out of holes cut in the side.  The only thing that I really have to do since a few simple initial steps is spraying with water a couple of times per day.  Though they are growing sloowwwllyyy relative to what the instructions say to expect, my guess is the dryness of the room has something to do with it.  None the less they finally seem to be forming some noticeable parts, so I snapped a picture.  We are super excited about the shiitakes with how outrageous prices are, and how delicious and nutritious they are.  Be back with results... sometime.

Saturday, December 3, 2011

DWC Strawberry

A few weeks back, in the wake of a very early snowstorm I decided I better not wait much longer before starting my hydroponic strawberries from the overabundance of runners that were sent out this season.  So I dug up five and set up my table top DWC system in a prime southern facing window.  I also set up an old HPS lamp that we had laying around to supplement the light to a full 12 hours of direct light. Now a couple of weeks later they are doing amazing, and one of them is even beginning to flower!

What I am pointing at is one of the remaining original leaves from growth outside. All of the original leaves were discolored and partially necrotic, likely a soil deficiency that we will have to fix next year.  These pictures don't really do justice to how healthy the other leaves are looking.


Something else that is doing surprisingly well is my pineapple plant!  I mentioned this very briefly in a previous post or two, but the story is I dropped the top of a store bought pineapple into my tomato system over the summer, and when I dismantled it this had fully established roots! So with my conclusion that my orange tree experiment was over (it never grew past a couple leaves), I dropped it in that bucket, and there it remains.  I just did a full water change after noticing a lighter green color in the new growth (which there is surprisingly a lot of since being out in full light).  Significant of a nutrient deficiency, which in this case was likely a result of old water throwing off the chemistry and causing nutrient lock-up. Unfortunately this picture isn't great, but the roots are awesome, and hang well to the bottom of the bucket, ~1 ft.

Wednesday, November 16, 2011

Summer Successes


So I have been super awful at keeping up with my endeavors online since things went awry in the spring, but I have continued endeavoring! And over the course of the summer my family and I have had a few successes despite some crazy weather for MA (We had perpetual rain for some weeks, tornadoes, hail, hurricanes, early frosts, and snow in october!).
The three tomato plants that I started in the spring are probably what did the best of anything. At their peak I was harvesting a large bowl full of heirloom tomatoes daily! They were super delicious. Up until earlier this year I never ate tomatoes, even on anything, and I would eat the yellow pears right off the vine daily. The yellow pears were the most prolific of the three by far, my speculation is that it was because of the placement of the plants in the system; the yellow pear was in the center, directly over the primary of the two airstones I had in the system, and the most area to grow due to the shape of the basin which the water was in. Aside from the fogger, which was removed mid-season, the system contained no plastics whatsoever. It is hard to see in the pictures, but I built a support cage out of chicken mesh, and used an old shovel handle to hold the plants up.
These first two pictures are from just before, and just after moving from inside to outside.
They took a bit of a beating, especially the yellow pear (center/ tallest). Taken in late May.

These are from a couple days, and about a month later

After some overzealous branching up  top in late July, my tying up gave way and the whole bush started to fall over, so I put a 12 foot 2"x4" in the ground next to it and began tying it up.  It reached about eight or nine feet before we got hit by a hurricane, and some sort of a mold/mildew/fungus took out all of the tomatoes in the area.
Also in this system, I rooted my new pineapple plant!


Next to the tomatoes, the other hydroponic things did pretty well. A DWC system which I had set up for my mom in the spring, which had three basil plants and a pepper produced a number of peppers and good deal of basil, though the pepper overshadowed a little. This system survived hell, the pepper plant, and even the whole system were blown over multiple times, causing branches to break off. There was also a twelve site fog culture planted with two peppers and eight or so basil plants of assorted varieties. It was not the best fogger system set-up, a lot of sediment built up on the fogger which clogged it. But none the less it was very bountiful, we made multiple pesto dishes throughout the summer simply through picking little bits off, and then when we really harvested, we made dozens of 4-8oz jars of pesto with it.
All of these pictures are from very early in the season, by the end everything was much larger.
Before move outside.

After move outside.


Though I shelved my indoor systems for the summer, I did set up one simple, experimental ‘garden’. I built a table out of scrap wood we had laying around and cut two holes in it the size of a five gallon bucket. Then I built something of a light box around it, and lined it with reflective film on all sides. I planted five basil plants in each bucket, placed one new airstone in each bucket, fed by the same pump. If I had light on, it was equidistant from each bucket. The one difference between the two buckets was that in-line to the airstone of one bucket I placed an algaculture relay system. In theory, via passing the air through an active algaculture, the oxygen content will rise in the air relative to the external atmosphere, thereby diffusing a higher oxygen content into the DWC nutrient solution. In practice, I took a clear mason jar, drilled two holes in the lid, ran a line-in which was to be submerged in nutrient water (to the bottom of the jar), then ran a line-out which was mounted just enough into the jar to be sealed, this was all sealed air tight with hot glue (silicon caulk in the future), the jar was filled with nutrient water leaving a small gap, I inoculated the solution with algae from a fish tank, and the lid was tightened on. The plants in each bucket grew equitably while the jar was establishing. It took a while to get established, but eventually the jar was a vibrant green and all surfaces were thick with algae. I then cut all plants back to the base-most node placing them on the same level literally and figuratively. Effect, after leaving them to grow freely all summer, the plants in the inline-algaculture-bucket were substantially taller, approx. 140% taller (~ 4-6 in.). I don’t consider this at all definitive, and I will likely try the experiment again, multiple times, before I am positive it is beneficial. The idea being that as with all life, plants use oxygen, especially at night, especially in the roots, so increasing the atmospheric oxygen in the root zone would potentially increase growth in some capacity. Whatever the end result, these plants produced wonderfully. Unfortunately it was too close quarters to get any good photos.
This is all of the basil we grew, inside/outside, soil/hydroponics from the night we made pesto.
Top is from soil plants.
Bottom left is outdoor DWC.
Bottom right is from my experimental DWC.
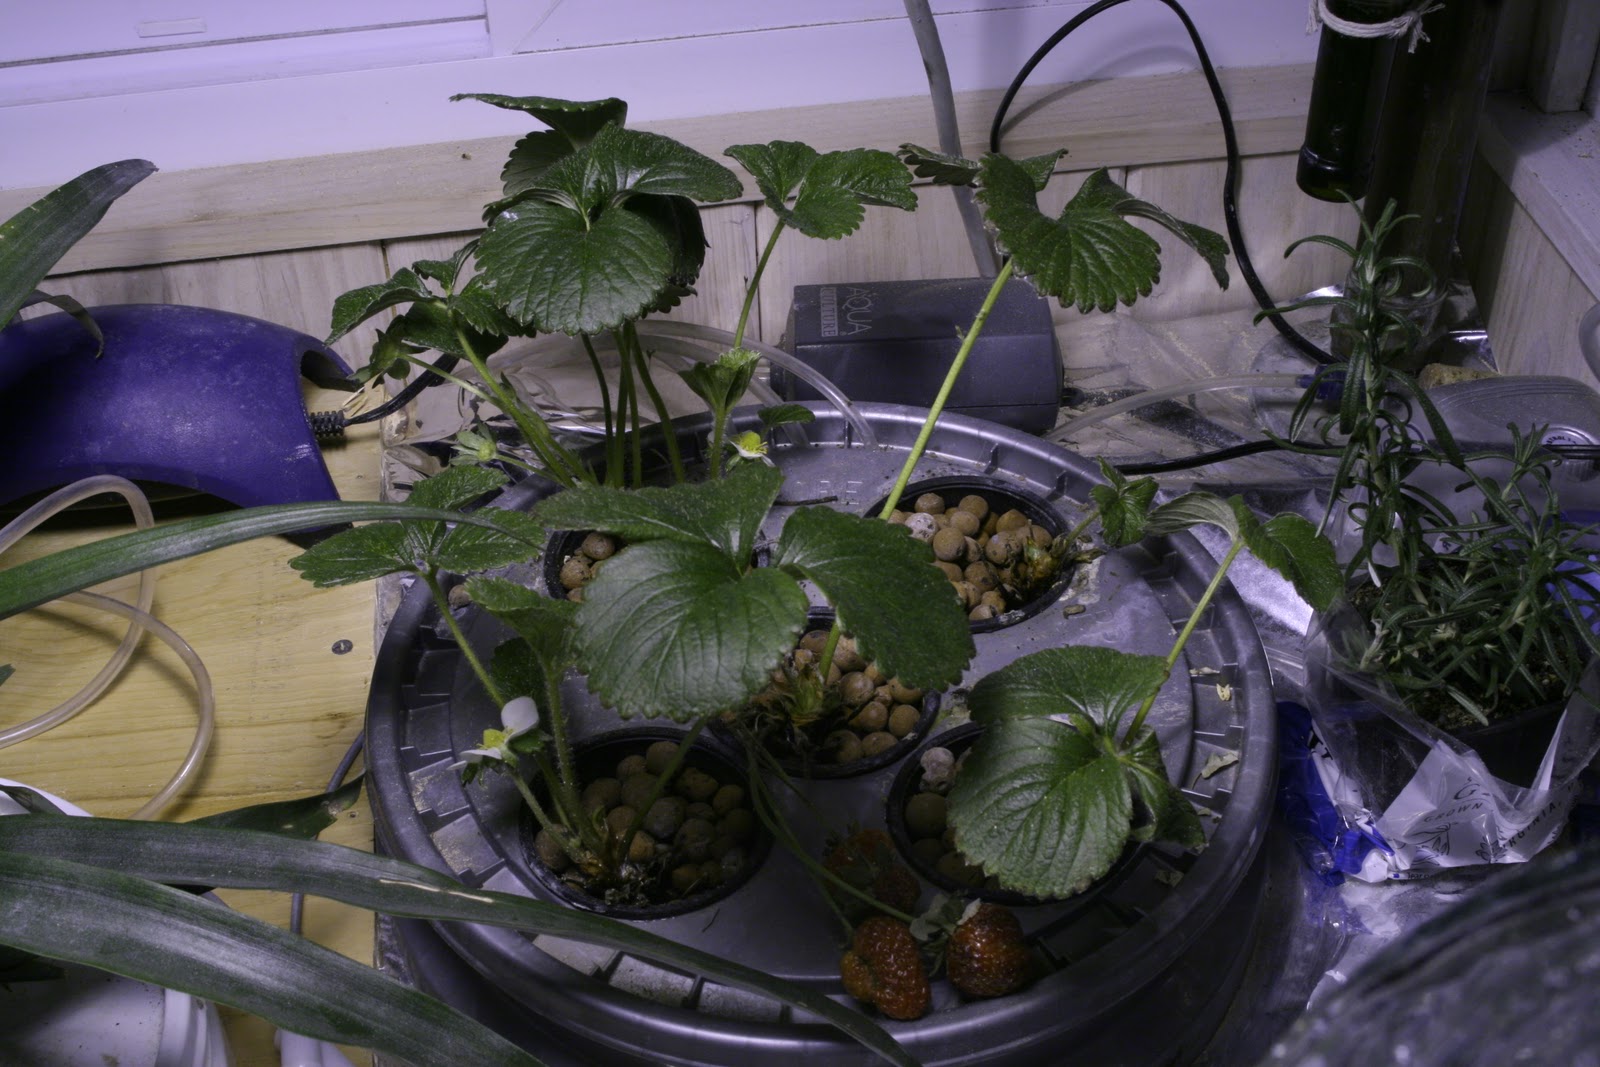
Now for the soil. It was super wet this year, and as I previously said we had some intense weather. But we have an extensive garden and some things did quite well. Potatoes, we grew nine different heirloom varieties, and we actually bought another fridge to store them all. The soil tomatoes (as well as the hydroponics, though earlier) were attacked by a mold, mildew, or fungus in the area and took a hit for it. Beans did okay though we had some pole beans labelled bush and vice versa, so we didn’t have the proper set-up for maximum yield. We planted strawberries, and they spread like wildfire, and produced some fruit. Onions did well, beets not so much. And as always we had plenty of lettuce, kale, chard.

This is the primary part of our soil garden, before much had sprouted.  In the center are onions, chard, lettuce, beets, spinach.  To the right of the central tree was all potatoes, ~25'x25'.  To the left of the tree out to the rope was all corn, but it didn't do fantastically.  And in the back left were our soil tomatoes. Kale and broccoli scattered everywhere.

The next picture is from what is now our berry patch off on the northern side-lot of our yard. Four blueberries, and a lot of strawberries (even more now!) this has all been covered in mesh.  Just out of frame to the left were our beans and some cucumbers.  An the picture to the right is of one of our cold-frames which we use to start plants outdoors before it is warm enough, and now to keep our lettuce alive past frosts and even snow this year.


I will likely be posting again soon, with the summer gone, and winter quickly approaching, I will be bringing much more life back indoors.  I have a few hydroponic things that I worked on, but never planted anything in due to timing which I will post some designs and pictures of.  And my WindowFarm(s) will be running and planted again in the next couple of weeks, so stay tuned, follow to be notified of any updates, and keep farmin'! Namaste.