Friday, July 30, 2010

My Newest WindowFarm

After a couple of weeks busy with work, and a friend bringing some long sought after jumbo wine bottles, I was finally able to take a crack at starting my next windowfarm. Primarily, this update serves to (as of now): enlarge reservoir volume, raise utility of bottles (plants up top), conserve space (it is a little shorter than the last), and better the aesthetic.
More or less using the same design, this farm uses three different sized bottles. The top module are big (approx. 2 L) bottles. In these I am hoping to try a DWC (Deep Water Culture) method, I hope that the drainage and refilling of the bottles will allow sufficient moisture, nutrients, and oxygen to the roots of the plants. These have 4" net pots so I am hoping the increased amount of medium will hold extra moisture too. Under that are standard sized wine bottles (3" net pots). Following that are beer bottles (2"net pots). And the last is a single large wine bottle to funnel the water more neatly into the bottom reservoir (and it has a 4"net pot too).
I haven't planted anything as of yet. But I do have strawberries waiting for a nice watery home. And I have some seedling broccoli coming up. And jalapeƱo peppers germinating. So it will be functional (and hopefully flourishing) very soon.
Here are some pictures:


Wednesday, July 21, 2010

My Modular Method

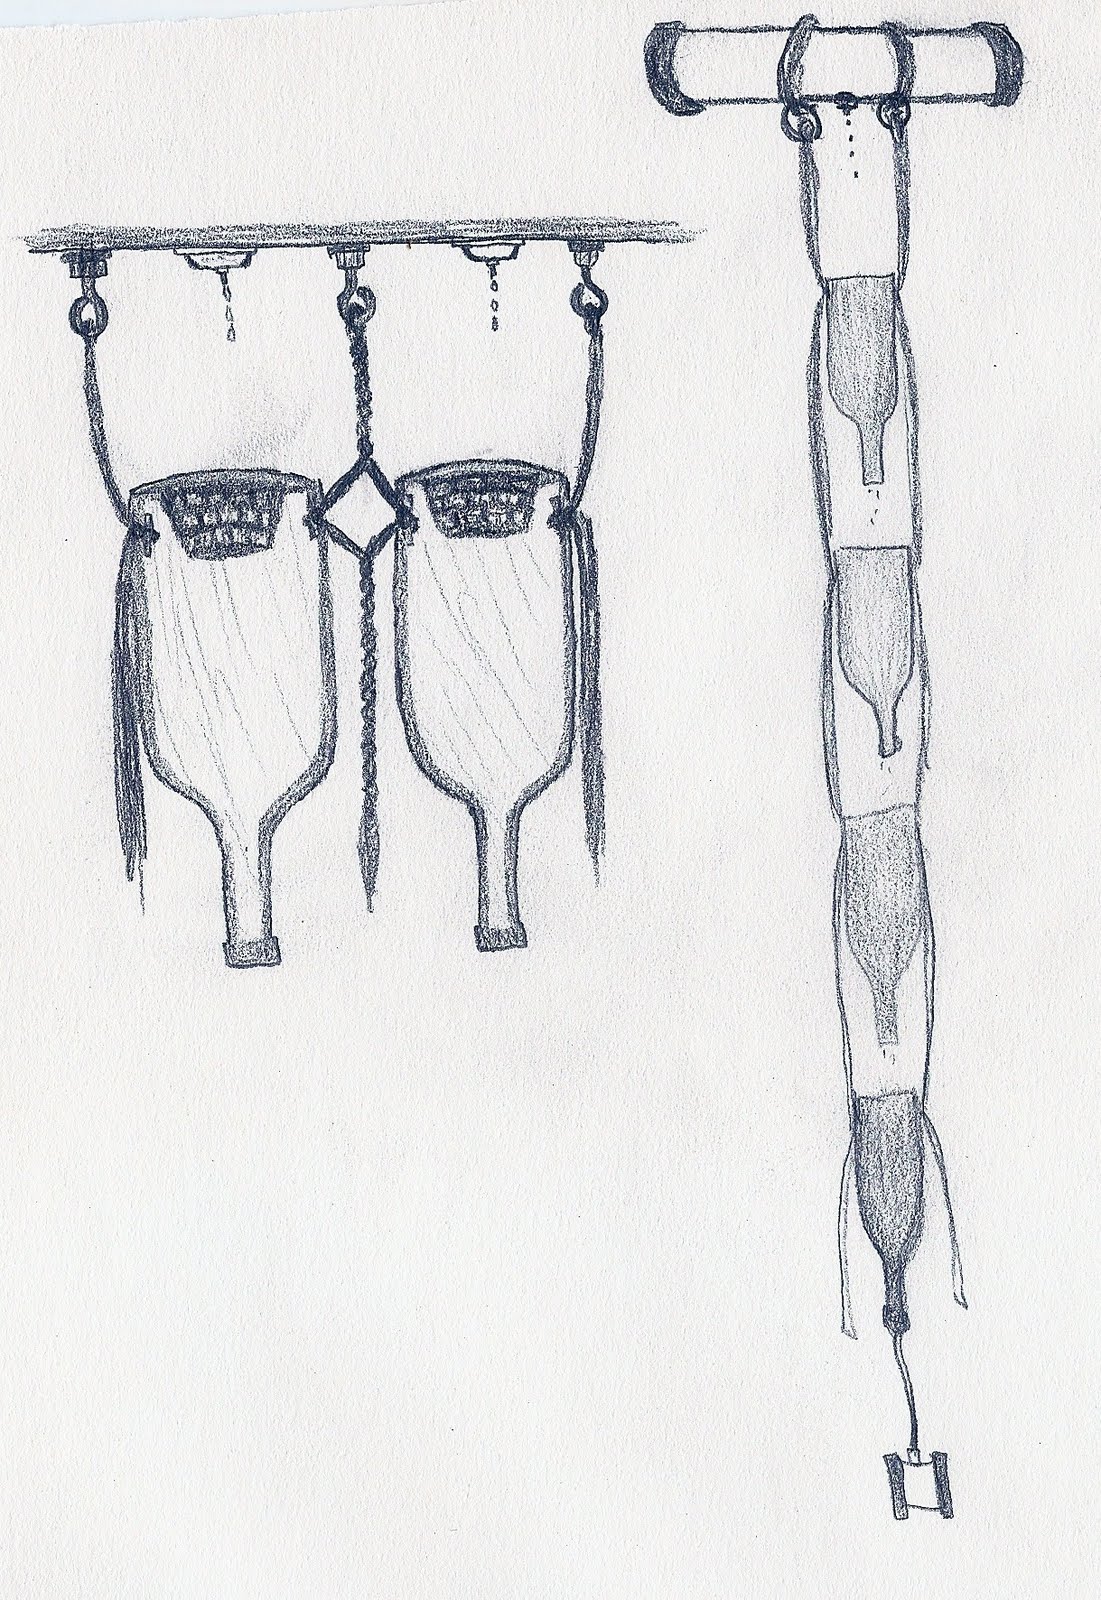
So, as me and a friend were sitting around, lighting fires, breaking glass, he tossed out the idea that possibly bunching the plants together would work; making a horizontal, three plant 'platform' of sorts. As we thought about it, we quickly realized that it would be a fantastic way to squeeze a lot more bottles in the already condensed space of a window garden. And if I was able to find a simple way to hold it all together, it could be a lot more yield for a lot less work as well. Unlike the way the plastic bottles are cut and mounted in the traditional windowfarm, where a hole is cut in the side leaving a dome covering the back and blocking light, the wine bottles are cut clean, so they can be lined up evenly, and the sun still shines through.

The way I have made mine so far is pretty simple, I only used twine to tie together the bottles, a single, continuous piece of rope to hang all of them on. It certainly is not high-tech but, it works, was cheap, easy to assemble, and it is adjustable (it takes some getting used to, but after a little time working with it, it will become easy). The way I tie the three together is only four steps:
1. Tie a single strand around the middle, to hold the bottles in place whilst tying.
2. I usually start with the cut ends of the bottles. Following the top pattern for wrapping with twine, I usually repeated until I had three lengths at every point. Pulled as tight as possible. Then tied it off.
3. With the uncorked ends, I then follow the bottom pattern. I pull really tightly to cause the bottles to act as levers and tight the previously tied string. At this point you can remove the first strand around the middle.
4. Tie an anchoring string between the top and bottom strands, at all three 'joints'. Like this one:


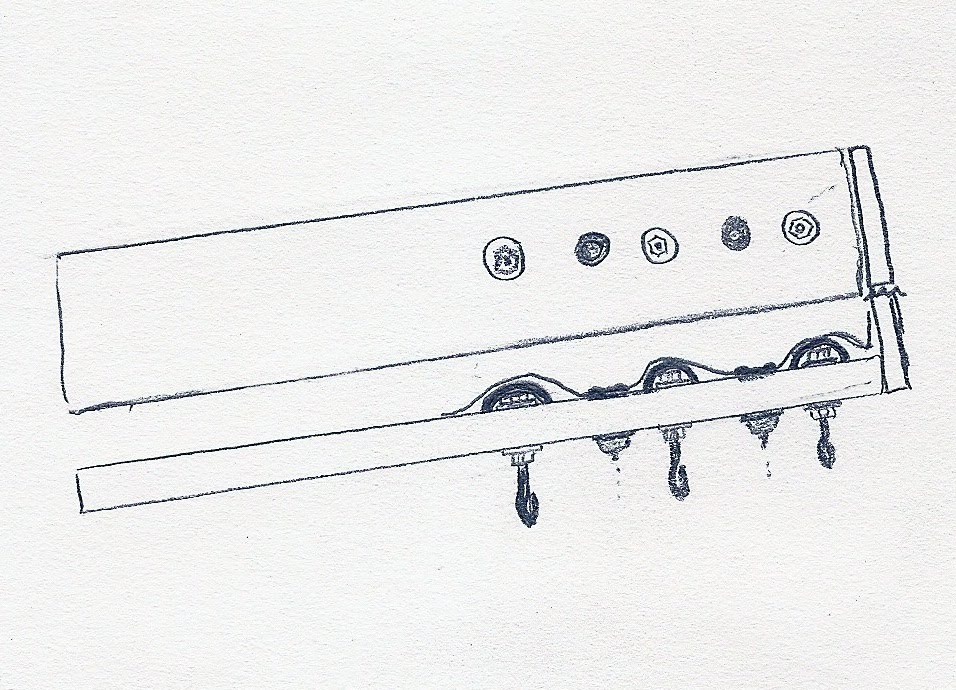
After you have done that, three or more times, the next step is assembling the tower. The top bottles will be used as reservoirs, I have planned on using the large sized wine bottles for reservoirs, but have not gotten my hands on any as of yet. But if anybody has them on hand, I encourage to try using those, more volume is always better. I have made two tiers of plants in my current version, because that was all I had room for. I had an old coat rack lying around and figured, as is, or better yet with a little work, it is perfect for building a portable farm. On nice days when we are home, we have been moving it outside to get more direct light, then bringing it back in at night. It looks like this:
And this is a little tutorial on how to tie it. I tried to make it simple and straightforward like the other one (I am using rope that is approx. 1/4" diameter, rated to 100 lbs.):
This first part is showing how I measured out the rope. I mark at 2'10" in this, but that was a tad long, aim for 2'8".

These last two parts are showing how to tie the bottom, if done correctly, it forces the modules to rest vertically on the rope. The necks generally positioned in a good place over the next bottles.
Lastly, you need to add a guide string at the top. The pattern I use for the best stability and adjustability is depicted in this drawing. It should be positioned between the top string and the cut ends of the bottles. It keeps the module stable on the rope.
You may want to also run a second length of rope to prevent the bottles from spinning. So far as I can tell, there is no light blockage between the towers (except maybe at midday if they are outside in the summer {but then they would be drying out in that direct light anyway}). And it has been working great so far. I recently transplanted eight lettuce plants into the other three bottles. One of them dried out and died, because the bottle is too small for the 3" net pot, and I didn't really expect it to survive. But I am designing a way to use a 2" pot (which is only slightly too small for this particular bottle). Something to keep in mind is the size of your bottles on the inside when choosing which you want for a module, because it is more work than it is worth to disassemble and reassemble if you end up with one awkward sized bottle, like me. Here are some more pictures of my two biggest plants:

Tuesday, July 20, 2010

Conceptualizations And Design Innovations

This post is a way to show how my design came to be the way it is. I have mentioned a few things and promised drawings in earlier posts, and I am now taking the time to bridge the gap between what I have posted so far and what comes next. Also, anybody interested in these materials, and this concept, but want to try other designs may find better use for the options that I abandoned for various reasons.

This is the very first sketch I did when I first started thinking about wine bottles. Originally, I thought that I was going to have to cut the bottles with a saw of some sort, and I planned on drilling holes in the sides to run string through (which would be anchored by a large piece of dowel). This look is wonderfully clean, but after going at the first bottle with a dremel for about half an hour and getting nowhere it wasn't particularly feasible (for my needs) to prepare bottles so slowly. And I was turned on to the method described in a previous post, which is infinitely simpler.
These next three are actually from the same piece of paper, but they were so spread out that it would have been impossible to discern what they were of, at the limited size. And these are particularly technical, showing what my next, more developed farm would look like. I still was planning on using drilled holes here, but otherwise they show what I was planning to do for the reservoir. I thought a PVC reservoir would look awful in the room where I had planned on putting this farm, so I designed a box, which initially I intended to line with plastic. Soon thereafter, I amplified my attempts at organic construction, and thought possibly latex waterproofing may work. In the end, I think using the bottles works better for my needs, but I have altered construction of the towers quite a bit.


Another reservoir model mock-up. This time with the tying method of hanging.
This was a VERY rough sketch of an idea my mom bounced off me for a framing system rather than tying. It would use dowels going across from the right side support to the left side support. At first we thought just one, but realized the water would just drip on and weaken the wood, or metal. So this is if using two, and slinging the bottle between them to make something of a Y. Align Left

Saturday, July 17, 2010

Prototype Success


Despite the indignant heat in the northeast this summer, and my sub-optimal location of my farm in a non-air-conditioned sun porch, the simple prototype I initially made has been relatively successful over the past few weeks. It is a simple (and fairly messily tied) single-column tower. I used the extra twine to fashion rope and attempted a few different tying styles to decide how I wanted the final model to be fashioned (me and everyone I asked decided on simple rope, with twine anchors). It is four bottles tall, and initially had a one-gallon reservoir. I had used a left over tropicana orange juice gallon jug for mixing nutrient solution in, and figured I could just poke a whole in the cap, hang it upside down over the top (empty) bottle, and let it drip. It took some finagling, but I ended up drilling a fairly large whole, plugging it with a small cork, threading a string through the cork, then covering the whole thing with wax to prevent leakage. It worked. For a while, until I had to refill the jug. Unfortunately, the cork fell apart due to too much water saturation. Luckily, it was a cool night when that happened so I wasn't worried about the plants drying out. And by the time I got up the next morning, my parents had been inspired to find a new reservoir to keep the plants nourished. We ended up with a cork in the top bottle, with a hole drilled through it, and a string through that. And that is where these pictures are from:
The three plants I have are basil, tomato, and pepper, respectively. The pepper is a little stunted because it was actually saved after we accidentally weeded it from our garden. The other two are relatively in great condition, no signs of nutrient deficiency. I have been using Foxfarm nutrient schedule, primarily the Grow Big Hydroponic and the Big Bloom. I also have some Cal-Mag Plus on hand in case of any magnesium or calcium deficiencies. My biggest issues at the moment are: too little sun, and too much sun. Too little in the sense that where this module hangs, it is inset from the south side window by 2 or so feet. I intentionally used an existing planter hook instead of putting it right in the window whilst I established the plants in the hydroponics. This has caused the plants to stretch out, reaching for the light. I also quickly realized that in the summer heat, if the dark bottles are directly hit by the sun, they heat up and quickly dry out the medium and cause nutrient build-up (this is what I meant by too much sun). In the winter, I am actually hoping that some of the heat build-up will help keep the plants at a more suitable growing temperature while near windows. I have resulted to hand watering when I put the plants in direct light, in order to keep them moist. All in all it has gone very well, and remained very simple throughout this first attempt. I have since transferred these plants to the newer design I have created based on an idea my friend had. I have added three net-pots with lettuce, though the heat is oppressive and I had a few mishaps while transplanting them. So far they have stayed alive, I am hoping they establish themselves quickly. I have also been putting together more tutorial sheets that explain how I assemble things. I will be posting pictures of the new farm soon, but for now you can see this one at least!
And for a taste of things to come: